A friend has a Hemingway DP-501 mark 1 digital piano where the metal plug came away from the plastic body, on the wire from the pedal board. The pedals are switches, not continuous controllers like more advanced units. I used a multimeter to figure out the wiring. With my dyscalculia it took over an hour to do this, checking and double checking. Then I soldered in a new plug. I made a table of the pin-outs which might be helpful to someone else 🙂
Pedal (Position)
Function
Wire Colour
DIN Pin
Left
Soft
Red
2
Middle
Sostenuto
White
4
Right
Sustain
Green
3
–
Common (GND)
Brown
1
It is not a bad piano at all, certainly good enough for kids to learn piano with dynamics and a decent sound if you turn up the treble. But the action is a bit clunky compared to similarly priced Casio models that are without the big speakers.
In music production circles, the question of whether a kick drum has “pitch” often surfaces – and frequently gets muddled. This post aims to clarify the distinction between pitch and timbre, highlight some key acoustic principles, and explain why tuning a kick drum is about shaping its character, not assigning it a musical note. We will also look at the special case of the 808 kick drum a clever piece of engineering by Roland that exploits how our perception of pitch and timbre works.
Pitch vs. Timbre: What Are We Really Hearing?
Pitch is a perceptual phenomenon – it is the experience of hearing a note. This typically occurs when a sound has a strong fundamental frequency and a harmonic spectrum where the overtones are integer multiples of that fundamental (Rossing, 2000; Levitin, 2006). Our brains lock onto this harmonic relationship and interpret it as a pitch, even when the actual fundamental may be missing.
Timbre, on the other hand, refers to the tone colour or texture of a sound. It encompasses the balance of frequencies, the envelope of the sound, and the way harmonics behave. Drums – especially kick drums – fall into the category of instruments whose sound is defined more by timbre than pitch.
What does it sound like?
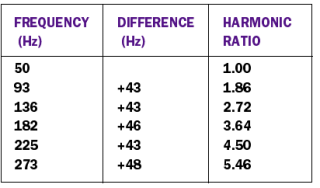
Here are audio examples of a modal series of a bass drum, table taken from here. The modes were measured from a bass drum with both heads stretched to the same tension, something you would not do often if at all, because it does not sound very nice. I used additive synthesis to make a sound with 6 modes- that is barely enough to make it sound like a bass drum. All the modes (i.e. frequencies) are at the same amplitude, and the decay is a bit longer than natural.
Audio files are progressively adding each frequency i.e. mode in the table.
I don’t know about you, but to me it sounds like a badly tuned orchestral bass drum. Interestingly, it sounds like the “pitches” are bending downwards. I promise there is no pitch envelope! So when Roland put a pitchbend on the 808 kick drum, they were simulating how your brain tries to interpret a bunch of close frequencies. It merges them into a pitch bend.
Real kick drums have more modes than this, and a shorter envelope. A short envelope on an 808 is how we make it sound unpitched i.e. more like a “real” kick drum. Longer decay is a special use case. Here is the last example but with a shorter envelope:
The Physics of Percussion: Why drums are considered unpitched
A pitched sound has a dominant, stable fundamental. A kick drum, however, features several low-frequency partials of roughly equal amplitude. These partials are not harmonically spaced – they don’t follow the harmonic series (fundamental, octave, perfect fourth, minor third, major second etc.) Instead, the complex vibrational modes of the drumhead give inharmonic spectra. These modal vibrations are described mathematically using Bessel. Each vibration mode corresponds to a distinct zero-crossing of a Bessel function, and the resulting frequencies do not align to integer ratios (Morse and Ingard, 1968; Rossing, 2000).
This non-harmonic modal structure may help explain why the sound of a drum typically lacks a clear, stable pitch. I would argue that it is also possible for listeners to latch onto key partials within musical arrangements, leading to pitch-like percepts even when no single pitch (as normally perceived) present. From this perspective, the classification of drums as “unpitched” reflects a general acoustic pattern rather than an absolute rule.
In acoustic classification, instruments like kick drums, toms, and snares are typically referred to as unpitched membranophones (Rossing, 2000). This categorisation is based on how these instruments behave physically, but it’s worth noting that the line between pitched and unpitched sound is not always sharply defined. The perception of pitch can become ambiguous or vary between listeners and contexts.
Finally, according to standard acoustical classifications, kick drums, toms, and snares are unpitched membranophones (Rossing, 2000) It is worth pointing out that this is not merely convention; it reflects how these instruments behave physically, as described above.
Tuning a Kick Drum: A Matter of Timbre, Not Key
Producers and engineers often talk about “tuning” a kick to match the key of a song. But in scientific terms, a kick drum cannot be tuned to a key because it lacks a stable, perceived pitch. What we’re actually doing when we “tune” a kick is shaping its timbre – adjusting the frequency distribution of its modes to either blend or contrast with other elements in the mix.
I argue that this is similar to the actions of EQing, mic placement, or sound design. It’s about making the drum sound better in context, not aligning it with a note on the scale. Tools like spectrum analysers can only offer approximations – they show energy distribution, not perceived pitch.
The Role of Psychoacoustics and the “Missing Fundamental”
Perception complicates things. Psychoacoustics tells us that the brain can infer a pitch even when the actual fundamental is missing – this is known as the missing fundamental phenomenon. Our auditory system analyses the spacing between higher harmonics to reconstruct the perceived pitch (Howard and Angus, 2017; Levitin, 2006). This is part of a broader neural mechanism that enables us to derive coherent musical information from incomplete sound spectra.
Furthermore, in the low-frequency range where kicks reside, pitch perception becomes particularly unreliable. Human ears struggle to resolve very low tones, especially when those tones don’t follow harmonic rules. I would argue that this is probably why kick drums can seem to have a pitch in isolation or context, but don’t consistently convey it across listeners or arrangements.
Case Study: The Roland TR-808
The kick drum sound from the Roland TR-808 is often described as having pitch-like qualities, but this perception arises from specific design choices rather than harmonic structure. Roland’s engineers used what we know about how percussion sounds are perceived to create a convincing kick drum timbre using the minimum amount of circuitry. Rather than attempting to model the complex vibrational modes of a real bass drum – which would require multiple oscillators (more than six as we have heard, and each with its own envelope) – they implemented a much more economical solution.
The 808 kick is based on a single sine wave oscillator, shaped by two envelopes: one extremely short envelope to control the attack and decay, and another to apply a pitch bend. This setup simulates key psychoacoustic features of real drum sounds – the rapid initial transient and closely spaced modes – which our ears interpret as percussive impact and low-end body.
When the decay is kept short, the resulting sound is typically perceived as unpitched. This is possibly due to the fact that the brain requires a certain amount of time to perceive a pitch. When the decay is longer, the descending pitch becomes obvious. This has become a musical feature of the 808 kick drum, to the extent that the machines are sometimes modified to have a longer envelope. Still, this is not the same as pitch in the traditional musical sense. There is no stable, harmonic overtone structure. Instead, the perceived “note” is a function of transient characteristics and the pitch envelope – not tonal content.
In short, Roland’s approach was a pragmatic one. By leveraging basic psychoacoustic principles, they achieved a sound that behaves similarly to a bass drum without needing to replicate its full physical complexity. This illustrates how pitch-like qualities can be simulated in sound design, even when no definite pitch is present.
Spectrum Analysers, Tools, and Mixing Realities
While spectrum analysers can be helpful in visualising the energy distribution of a kick drum, they cannot definitively tell you about pitch. Understanding how these tools work (FFT size, windowing, smoothing) is critical to using them effectively.
As one forum user aptly put it, “The only tools I know are ears and prayers.” Mixing low-end content is one of the trickiest aspects of production, and while analysers offer clues, tuning a kick remains a process of listening and adjusting, not assigning note names.
Bonus- the snare drum A snare drum is also a percussion instrument, which does not have the harmonic series, but almost does. It typically generates two quasi-harmonic series, with fundamentals roughly around 180 Hz and 330 Hz, but these are about three-quarter tones flat of an octave, so like the kick drum the harmonic series deviates from perfect harmonic spacing. The first several modes of the drum membrane itself create multiple frequencies (harmonics). Along with that the snare wires themselves add higher-frequency noise and rattles, contributing to a far more complex spectrum than the harmonic series.
Due to the drum shell, the two drum heads/ membranes, and the snare wires, the number of harmonics in a snare sound can vary widely depending on head tension (a.k.a. tuning) and striking force. Generally, you can expect at least 7 to 9 prominent drum membrane modes plus a noisy texture from the snares (that’s the wiry thing underneath that gives the drum its name), which creates a broad harmonic and noise spectrum extending well into the high frequencies.
In summary, the harmonic content is rich and complex, with a few distinct quasi-harmonic modes and a noisy, inharmonic overtone spectrum.
Conclusion: It’s About Context, Not Notes
The key takeaway is this: kick drums (and snare drums) do not have a perceptible pitch in the traditional sense, but they can be “tuned” for timbre. “Tuning” a kick is about its integration in the mix, not its alignment with a musical key.
Our ears are suggestible and context-sensitive. What you think is a pitch might just be a dominant partial or an artefact of the arrangement. And that’s fine – music is full of perceptual illusions. But understanding the difference between what’s measurable (frequency) and what’s perceived (pitch) will help you make better decisions in your production process.
“The essay… argues that human agents are analogue agents from an analogue world. Digitality, by contrast, is an essentially alienating sphere wherein digital media cannot replicate analogue communication processes without generating gaps, voids, and ‘missing information’”
I respectfully propose that there are three mistakes in this assertion.
First mistake: We are not analogue. We are real. The term “analogue” is often misused in contemporary discourse, as is its root, “analogy.” The terms analogue and digital describe systems that represent or parallel reality, but they are not synonymous with reality itself.
Second mistake: Digital is analogue. Both digital and analogue systems are methods of representing reality, each with distinct mechanisms and limitations. Digital media must ultimately be converted into an analogue form before we can perceive it through our senses.
Third mistake: digital systems act as an intermediate state. Properly functioning digital systems replicate the information they encode with high fidelity. This is explained by the Nyquist-Shannon-Kotelnikov theorem, a fundamental principle of information theory that underpins modern technologies such as communication systems, space exploration, medical diagnostics, and statistical analysis. Digitization allows us to store, analyse, and manipulate information efficiently. If the digitization process significantly altered the original information, these systems would fail to function correctly.
Stairstep approximation- this is not how digital works 🙂
The concept of “gaps” in the digitization process reflects a misunderstanding of Shannon’s theorem. When the range of information required to be encoded is defined and the sampling rate meets or exceeds twice the highest frequency in that range (as per the Nyquist-Shannon sampling theorem), the digital system can accurately capture and reconstruct the original signal. The reconstruction process does not involve a stair-step approximation of discrete levels; rather, it follows a single mathematically determined method to interpolate the original continuous signal. This principle is mathematically established through Shannon’s theorem and is demonstrated through visual and auditory examples, such as those presented in this video.
In everyday language, we still differentiate between “digital” and “film” cameras, which may reinforce the notion that these systems are fundamentally distinct. This obscures the reality that both are representations of the same underlying world. Such misunderstandings might reflect cultural habits of oversimplification or a broader disengagement from creative practices. The commercialization of art may discourage individuals from pursuing it, based on the mistaken belief that art must equate to perfection.
A skilled craftsman using either a digital or a film camera can exploit the unique strengths and limitations of both mediums. For example, Pierre Schaeffer Man Ray and Jimi Hendrix leveraged the imperfections of analogue tools—such as tape recorders, film and valve amplifiers—to create distinctive works. These so-called “flaws” have since become integral to the aesthetics of music, film, and photography, shaping our cultural practices and preferences.
Human memory often fails to fully account for life before technologies like film, vinyl, or tape. The pre-industrial world offered different sensory and artistic experiences. Attending a live play or listening to unamplified music- in a theatre or around a campfire- can provide a more direct connection to human creativity, unmediated by technological systems.
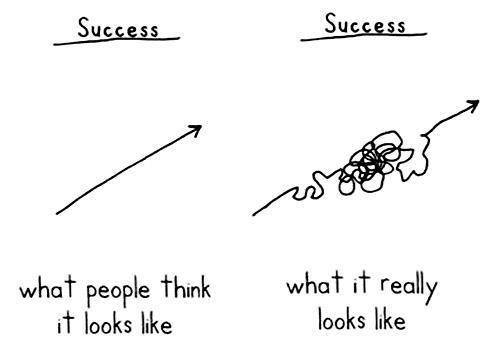
Artistic success often involves iterative failure. Recognising and embracing this process might encourage more people to engage in creative endeavours, regardless of the tools or mediums they choose.
As the saying goes, those who succeed typically fail more often than those who never try.
I had an exciting chat with my friend Paul Brewer. He was looking for an overview of the teaching of Sound Production at Degree level in Ireland. If you’re interested in music production check out his podcast. I think it’s the best Irish one out there and gives unique perspective on the field. He’s a great interviewer and he kept me on topic 😁
We explored the ins and outs of teaching sound at degree level in Ireland, for both music and film/ broadcast students.
Collaborative team projects that give students hands-on experience in various roles: we call them Integrated Projects.
The work of Jason Corey, whose research and software modules provide an excellent resource for teaching critical listening and ear training.
The differences between music and TV/ broadcast/ film production, and looked at the realities of working in both fields and the technological distinctions between them.
The importance of using the right tools for the job and the need for equipment that doesn’t get in the way.
Finally we talked a bit about referencing classic productions and also microphones.
It’s something students struggle with and I would’ve liked to say more about it. In their responses or self-evaluations students will often say “this is good pro sound” but they don’t have a concrete example or definition of what that is, and often they don’t reference other works even though they are often huge fans of film or music.
Getting them to channel that love of their favourite musician or film maker can be a very enjoyable process. Sometimes they are not even familiar with “the classics” and it’s fun seeing their reactions when they hear the good stuff.
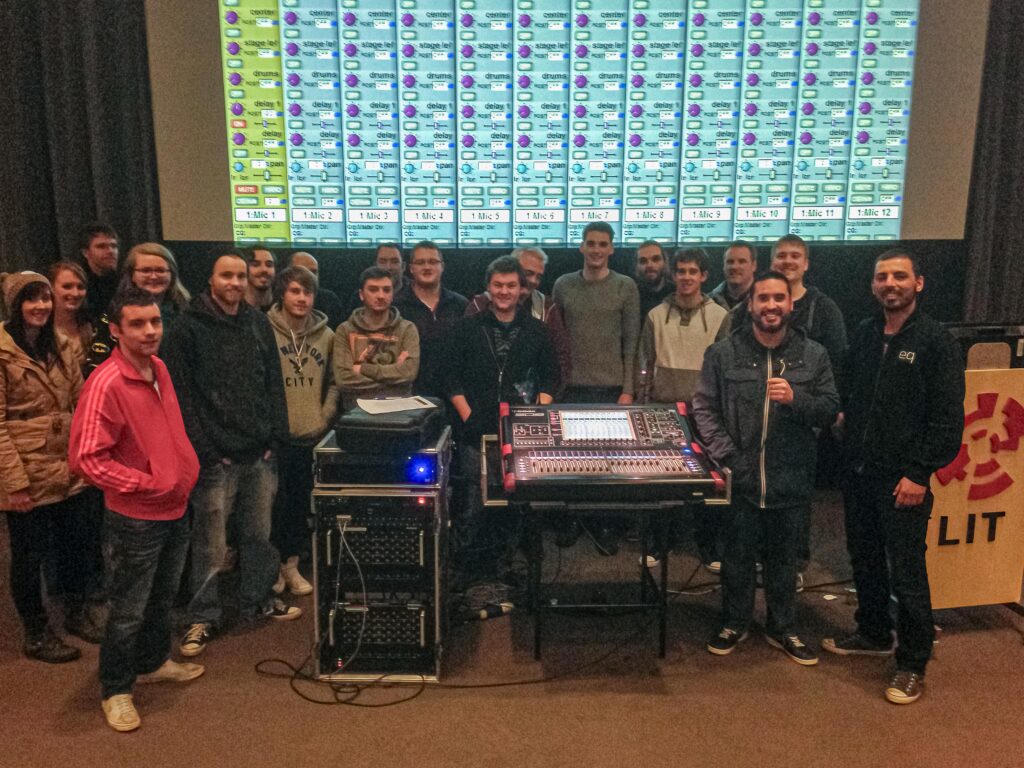
My third year Sound Reinforcement students with the DigiCo Red Snapper back in 2014
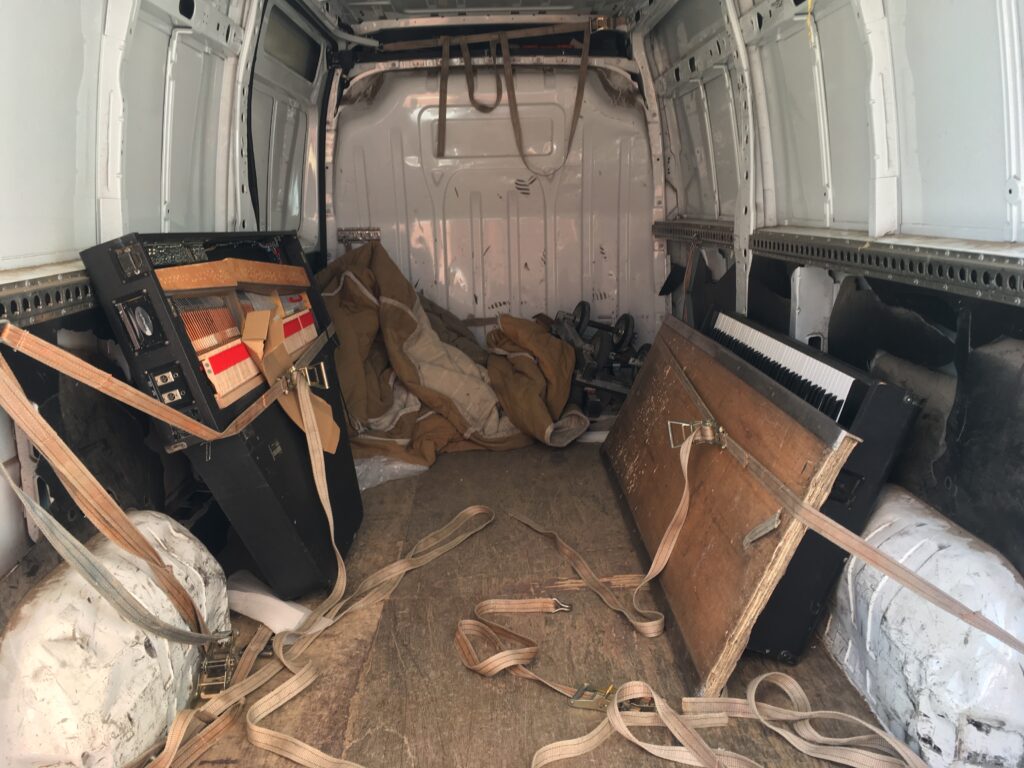
I had a chance to liberate a Yamaha CP80 from a school in Cork who were not using it. My friends at Moloney Pianos loaned me their van, isn’t it cool?
Don’t do this…
The first stumbling block was that the flight cases were missing. The piano comes in two parts, that’s the harp on the left and the keyboard on the right. I only used one strap for the harp, so it slipped on the journey home with a very loud bang! Thankfully these pianos are incredibly well made, so there was no damage apart from a small tear in the faux leather finish (known as tolex in the US).
How NOT to move a CP80!
A dream I didn’t know I had
A long time ago I had a conversation with Jenny Lindfors about what our favourite electric piano was. She argued for the Fender Rhodes, I argued for the Wurlitzer EP200. Not only was she wrong (the Wurlitzer has the superior timbre, sorry Jenny just kidding!) but I was in a way denying myself. My ultimate favourite is the Yamaha CP80. But these are bigger, rarer and more expensive than the others. I just never dreamed I could own one.
What does it sound like?
It was the instrument favoured by Prince, Peter Gabriel, Tony Banks, Brian Ferry, U2 and Simple Minds. For the classic album So, Peter Gabriel really only had the Fairlight, the Prophet 5 and the CP 80, with occasional Yamaha CS80. If you listen closely you will hear that an awful lot of the sounds on the record are CP80 with a lot of effects, particularly things that sound like bright electric guitars, bells, Gamelan and tuned percussion; as well as regular piano. Unlike the Rhodes and Wurlitzer, the CP is a chameleon.
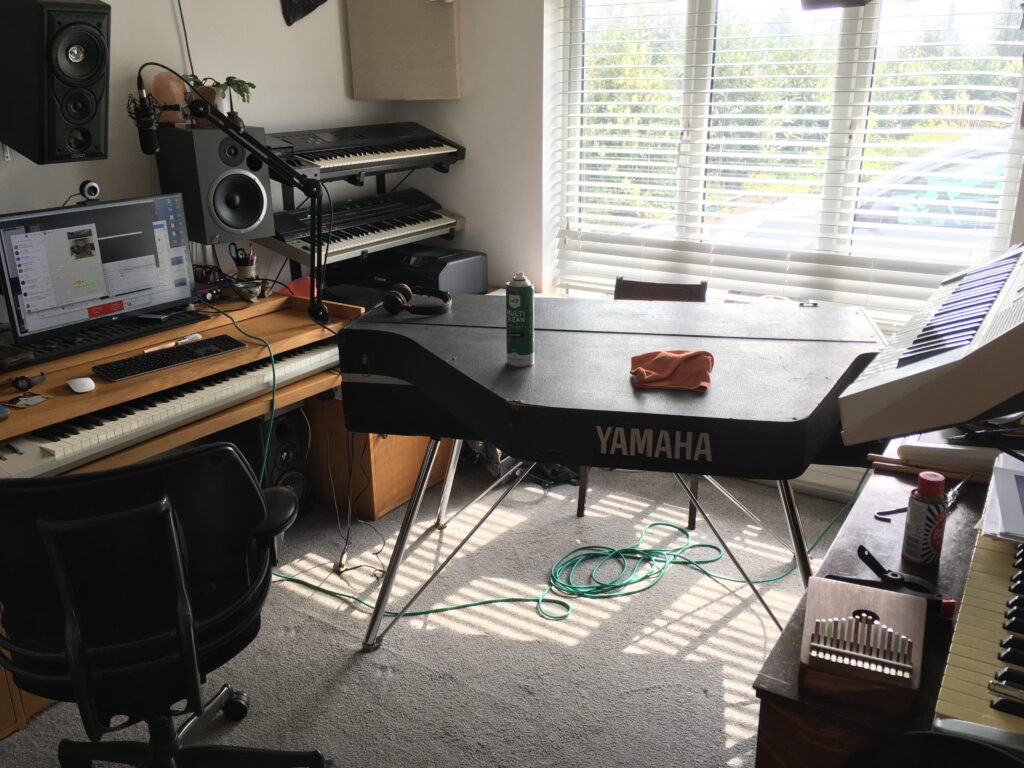
The CP quickly assembled in the studio
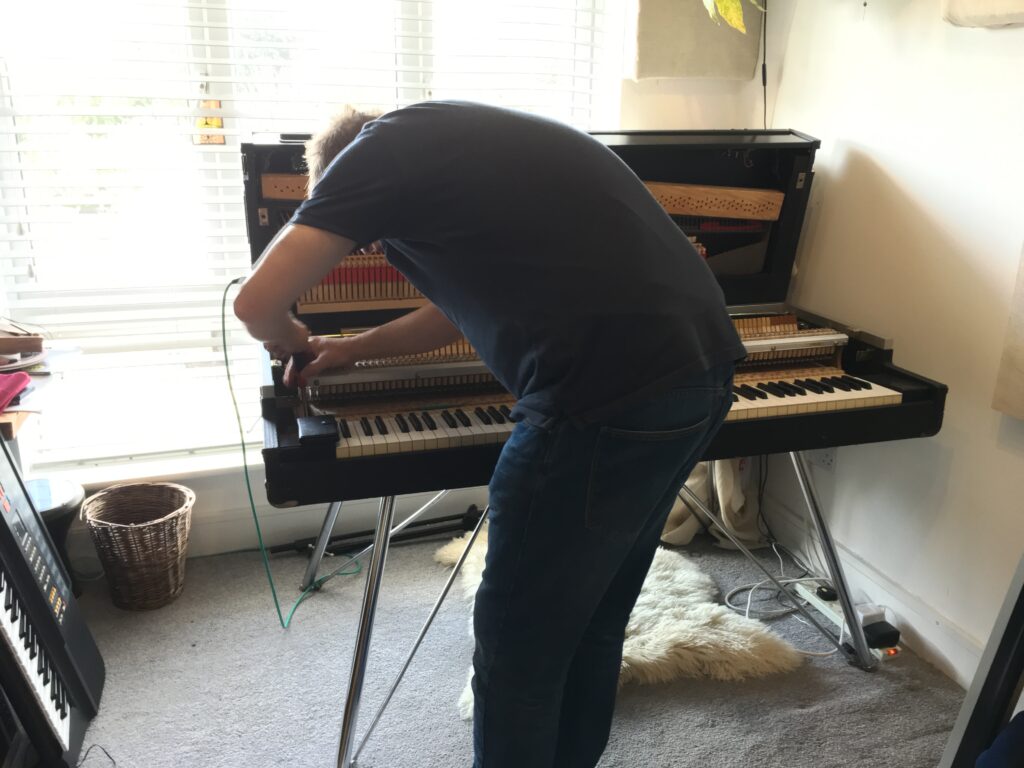
Careful, it’s heavy!
So I got it in to the studio, and with the help of a friend lifted the harp onto the keyboard. The brochure claims this is easy- it is not. The harp weighs over 60kg, and the hinges you must attach it to are very small. Don’t attempt it before both people are fully aware of how the hinges attach!
Getting started
First thing was to clean off the mould and dust that had built up on the case and keys. This was easy, using Tec7 foam cleaner and elbow grease. It became apparent that someone had used some kind of solvent based leather cleaner on it in the past, this made an unpleasant smell for a while but this was thoroughly removed with the Tec7.
Repairing the Power Supply
Someone did a messy job “converting” it to 230V. Incredibly, they decided to remove the XLR power connector and twist on the bare wires from the new PSU. There was not enough space for the rest of the power harness so some wires had to be lengthened and soldered back. At least they used a good quality transformer!
Working on the pre-amplifier
It was apparent that the smoothing capacitor was underperforming, this was confirmed by removing it and testing. I replaced it immediately. I suspect that some of the capacitors in the audio path may also need replacing. The output seems to be relatively dull sounding. I plan to test this observation by bypassing the pre-amp and doing an AB test with a split signal (possible because the impedances are so high). The pre-amp is incredibly well designed, it is all discrete with transformers for the balanced outputs. There are only two ICs, these are to control the tremolo so they are not in the audio path as far as I can tell. It is very very clean sounding.
Tuning it…
I spent a couple of days trying to tune it myself. It’s not as hard as a regular piano, and Yamaha even list the exact pitches in a table so you can do the stretch curve correctly. Even still, this is best done by an experienced piano tuner! I like to think I made his job a little easier by getting the pitch a bit closer to concert 🙂
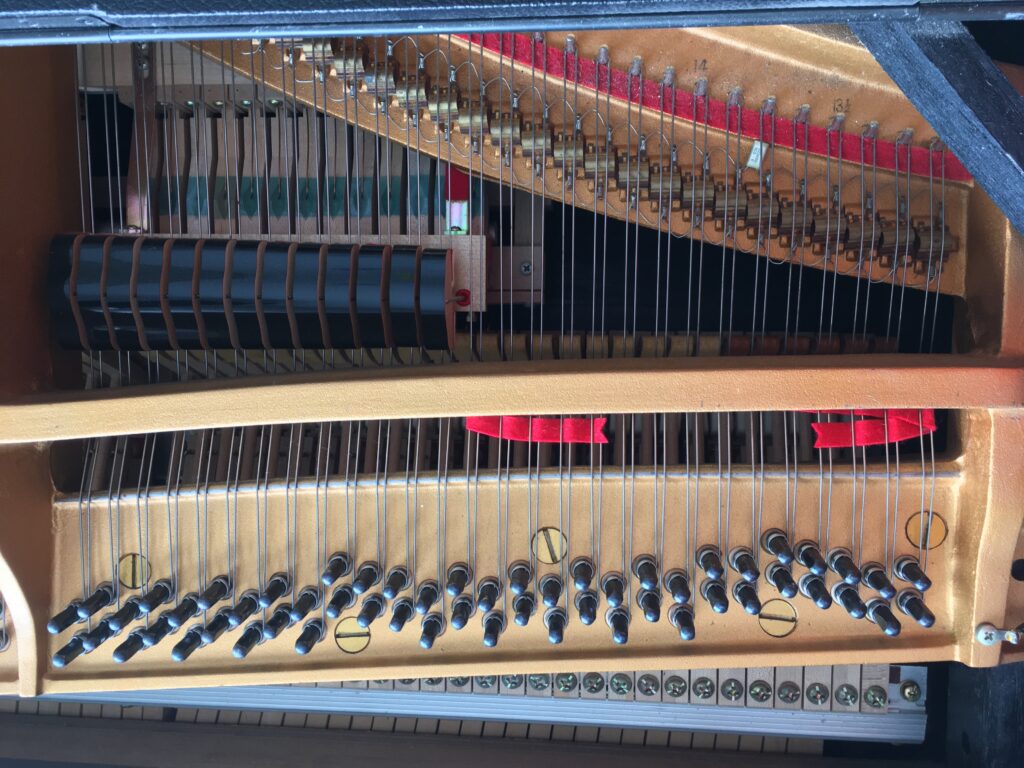
The sustain pedal works by lifting these dampers
The dampers are those black things. When you press the sustain pedal, it lifts them off the strings so they are not damped, and will sustain. There are no dampers on the top 14 keys- this is normal for a grand piano (that’s the CP on the left). On a regular upright, there are no dampers for the top two octaves (right).
Nina really likes the vibrations from the piano. You can see the Tec 7 in the background.
The expert arrives
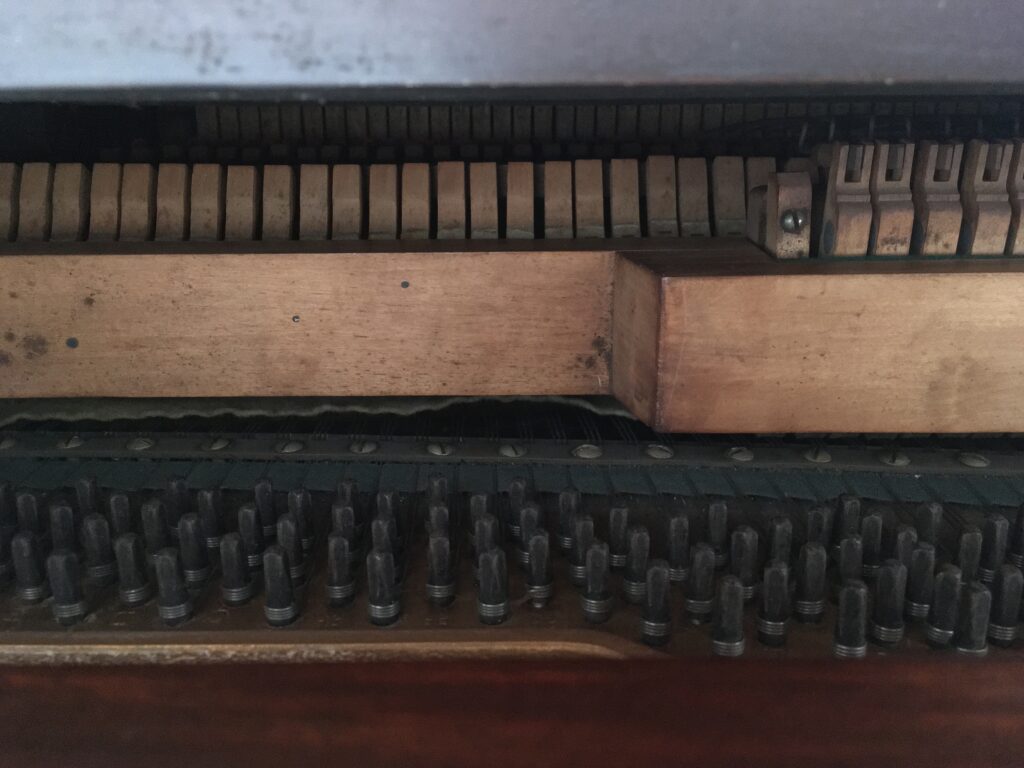
Chris, the expert at work. It really took 3 days to get everything right. Here he is just beginning regulating the action.
Since it had not been services in at least 10 years, the action had become stiff and heavy. There are about 8 hinges on each key, and a bunch of other adjustments. It’s exactly the same mechanism as a Yamaha concert grand piano. Making this work smoothly, with musical dynamics, is known as “regulating”. I briefly considered regulating the action myself. Moloney’s had a Yamaha grand that was being regulated by Chris Moore, so I went along to see how it’s done.
Within about 30 seconds of observing Chris at work I realised this is a highly skilled job best left to an expert! It was quite a nice grand piano when it had arrived at the shop- after Chris spent the best part of a day on it, it was incredible. So I asked him to do the CP80.
It’s such an inspirational instrument, I have a Zoom H2 permanently connected to the unbalanced line outputs to capture ideas. I use the balanced XLR outputs for recording in the DAW.Studio re-arranged to accommodate the inspiration machine 🙂Nina loves it 🙂
A shotgun mic is designed to ignore any sound arriving at the sides. This is how it focusses totally on the sound arriving from the front. It works great…
…unless side and front sounds are the same!
Read on to find out why…
The length means this vintage EV microphone is directional down to very low frequencies
Outdoor environments
are wide-open spaces. That seems so obvious right? But bear with me. Usually there are no reflective surfaces nearby. Nothing for the sound to bounce off. The main problem for sound outdoors is the ambient noise. On the other hand, indoor spaces are enclosed. You are surrounded by reflective surfaces such as walls, floors and ceilings. For us it is cosy, warm and sheltered :). But it can be a big problem for sound.
Let’s think about sound outdoors first.
You get in close with the mic using the boom arm. Great, we have nice clear dialogue. Now we will break the sound down into its component parts. The sound arriving at the sides of the mic (ambient) is completely different to the sound arriving at the front (dialogue). Put very simply, the shotgun mic has slots along the sides to break up the sound. Sound coming right in at the front goes straight down the tube. So it ends up being louder than any sound at the sides (known as”off-axis” sound). Incidentally, the longer the tube is, the better this works!
Now let’s think about indoors.
We have reflected sound made of the dialogue bouncing off all those surfaces. But indoors the sound arriving at the front of the mic is also dialogue! So it ends up canceling with (a delayed version of) itself. This creates what is known technically as phasing. What is that? It’s that metallic, harsh, whispery, un-natural quality that makes dialogue hard to take.
The solution
is to use a cardioid (or hyper or super cardioid) indoors. It will sound much more natural and engaging for your audience compared to a shotgun mic.
With lockdown I’ve been going back through the archive of old tapes to digitise them. Both stereo and four track tapes. The topic comes up often on the Sound On Sound forum, and I am grateful to Hugh Robjohns and James Perrett there for the advice and discussion over the years. Along with my own practice, I’ve whittled the process down to 12 steps.
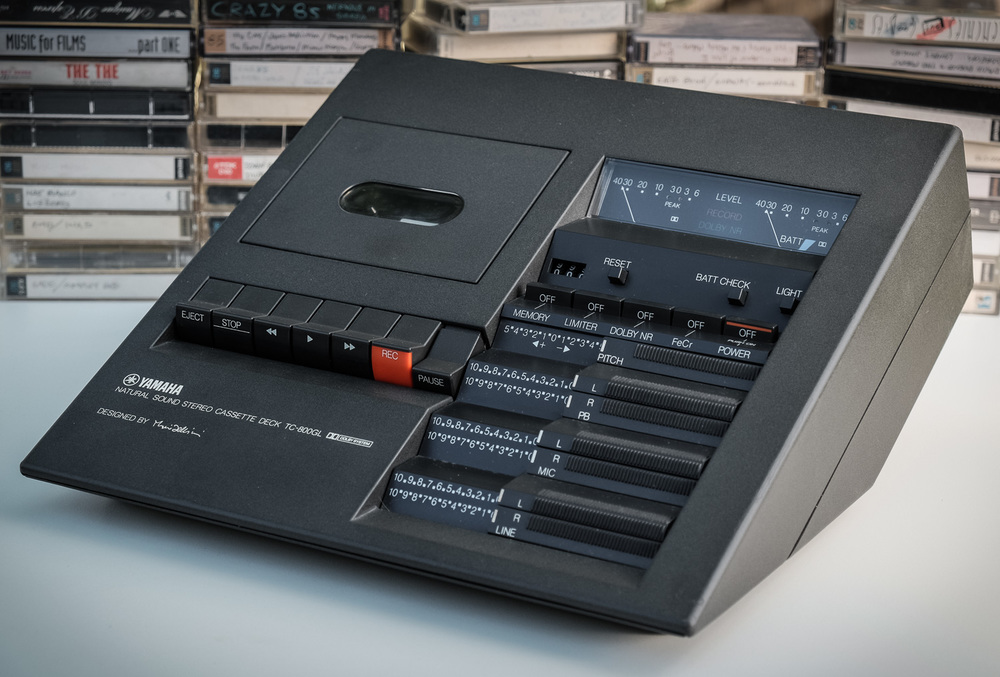
Yamaha TC-800 GL, the first deck I ever used (it was my grandad’s). Just look at that cool little mixer and those lovely big VU meters!
1. You will need a decent cassette deck
Ideally a standalone hi-fi unit with a line output. These are usually on phono connectors. You can connect this to the mic/ line input of your computer. Even better, use an audio interface so you can optimise the level.
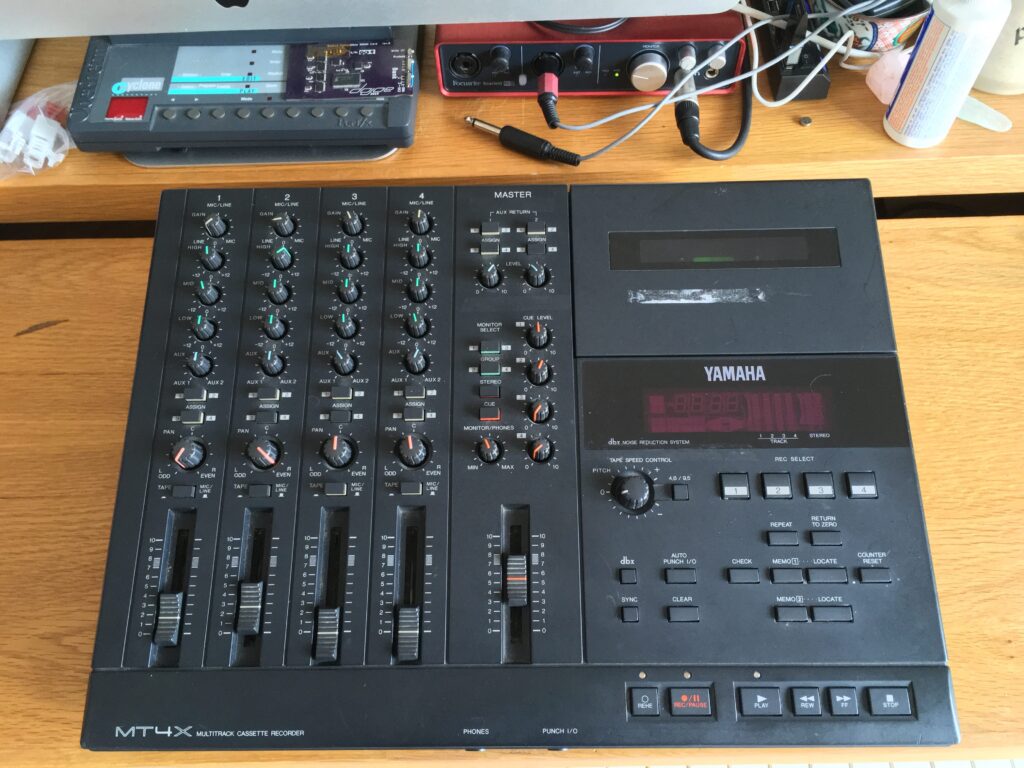
I use a Yamaha MT4X four track. This can play regular cassettes as well as the four track ones. It’s one of the best decks Yamaha made, with a very low noise floor and a frequency response all the way up to 18kHz, out-performing the Tascam and Fostex four track machines. The only machines that are better are the fairly rare Marantz four track recorders.
Yamaha MT4x four track with dbx NR and an excellent transport. Will play regular casssettes.
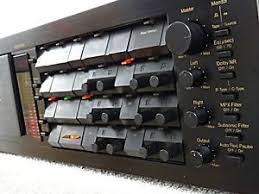
Nakamichi Dragon: bristling with controls, the ultimate cassette deck.
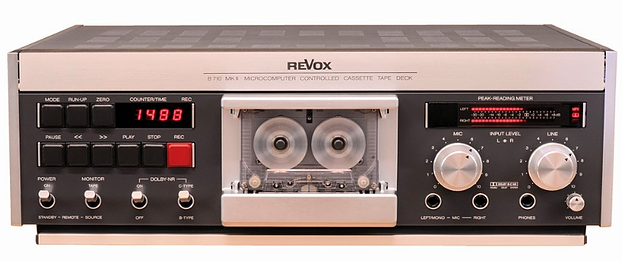
The Revox B-215. It’s just lovely.
These are easy, but won’t sound optimal.
I would advise against the Walkman sized USB players you can get (pictured above). These will be wobbly and noisy with even the best tapes, so you will not get the best out of the tapes you have.
2. Any audio interface will do, even the one built in to the computer
The signal to noise ratio of the average cassette is around 50dB, far worse than any modern digital device. Best case for a recording would be 85dB with noise reduction engaged on a top flight deck (or the Yamaha above) and we’re assuming the cassette will never degrade over time. To put it simply: the quality of any modern digital device will be a lot better than most cassettes. The audio interface I use is a humble Focusrite Scarlett which is around 110dB! This is a very popular model for a reason: it’s reliable, clean and neutral sounding, and best of all Focusrite have very good long term driver support.
3. Change the shell
There are two good reasons to do this. Firstly, the pressure pad can often become detached or disintegrated. Secondly, to reduce excessive tension causing speed variations and pitch wobbles. The old shell can often lose its lubricant, or maybe was not very good to begin with. Make sure your hands are clean and grease free and work on a large surface with plenty of light. Carefully remove the reels from the old shell and put them into something really good like a Maxell XL-IIS shell.
These pitch wobbles are known as wow and flutter. If it was baked in to the recording, there are plugins that can remove it such as Melodyne Capstan, and the proprietary service Plangent Processes. These are very expensive. The Izotope RX Wow and Flutter module is a little less expensive.
Give yourself plenty of light and a clear workspace for this task.
4. Clean the heads
I think we all know about this step, but here are some tips. If the tapes are old and are ferric, you’ll need to do this between each tape you play. Wait about one minute for it to dry, and clean ONLY the metal parts. Don’t use alcohol on the rubber parts of the transport because it will dissolve them eventually.
5. Adjust the head azimuth
We’ll need our ears for this! Listen to the playback with L and R summed to mono. Adjust for maximum treble. If the tape is really bad, boost the treble with an eq so you can hear what little high end there is. Super-tweaky tip: if it was a mono recording, do still record L and R, and combine them to mono to get slightly less tape hiss.
Make sure you adjust the play head not the erase head!
6. Don’t use noise reduction
Even if Dolby was used, consider leaving it off. Why? Here’s the simple explanation. You can actually hear the difference for yourself- playback the tape and switch the NR in and out.
The technical explanation: noise reduction is a good thing. But tapes lose their magnetism over time. This will cause the Dolby playback to operate incorrectly. The circuit will think it is hearing a quiet part of the tape, and apply too much noise reduction. Professional machines let you adjust the level going in to the Dolby circuit to compensate for this.
If that’s too technical for you, just leave the NR switched off and think of it as a free high frequency booster that you can polish with eq later. Most of the time, you will need as much high end as you can get from the tape!
6.1 Caveat
For regular cassettes this idea works fine, but for most four track tapes it won’t work. These more commonly used dbx noise reduction not Dolby. Again, you can hear this for yourself if you switch the dbx in and out as the tape plays. It doesn’t just change the high frequencies, it changes the dynamics as well. It literally makes the music “suck”.
7. Contradicting step 6: do use noise reduction, but not on the tape deck!
This is a tip I got from James Perrett on the Sound On Sound Forum. An even better approach, is to, again, leave the NR off, but this time apply it with a plugin. The only plugin that can emulate Dolby A, B and dbx is U-he Satin. I’ve had great results with the Dolby emulation, not so great with the dbx. Anaxwaves is another great option and it is the only one that can do Dolby C NR.
The tone of the tape will be much nicer because you can adjust the level in the plugin, instead of trying to find a professional deck to do it on. Another big plus is if you denoise (which I will explain in step 8) BEFORE the Dolby plugin, it does a much better job of removing the noise than Dolby can, plus you get more treble back off the tape, with a smoother top end than no NR at all. In my experience this is especially noticeable with cymbals, and the esses in the vocals. I haven’t tried it with dbx.
8. Record all of the tape in one go
Record all of the tapein one go including the silent bits such as the blank leader.
I mean it. Play the tape, hit record in the DAW, and walk away for an hour.
It’s much easier to edit afterwards than sitting there listening to which parts of the tape you want. Make sure to keep the original file un-altered as a backup. I often find I need to go back to these later. Especially if better plugins come along that can improve the sound.
9. Noise removal
This is different from Noise Reduction. NR needs to be encoded in the recording, and decoded on playback (see step 6). Noise removal uses a computer to figure out which part of the signal is noise, and which part is actual audio. I use Izotope RX. If you use Reaper you’re in luck because you have Reafir: Kenny Gioa shows you how in this video.
If you can find a section of tape with no audio, just noise, the plugin can “learn” the noise profile, and then “intelligently” remove that from the audio. I usually do a profile for each song, if there’s a run in of no audio. This way, you can deal with noise generated by the gear used to make the recording as well as the tape itself. I also add the blank leader to the profile so Izotope can remove the noise the tape deck itself adds.
10. Use whatever eq you like, and as much of it as you need
Don’t be afraid to use several instances in a row because you will need severe eq especially to restore the top end. I also like to use a multi-band compressor, but it’s up to you what is needed to restore the sound to a useable quality, or enhance, or whatever you choose.
My personal choice of plugins for cassette audio enhancement.
11. Often the top end is not there so you have to fake it.
For various reasons cassettes will not have the brightness and zing that we are accustomed to since the CD came along. Some simple processing can help with this. I find that the freeSlate Fresh Air plugin is great for this. I used to use their Revival plugin, that is good too but a bit fiddly to install since it comes in a package. It’s a free and very easy to use aural exciter. Another good free processor is Voxengo GEQ it’s a combined graphic EQ and exciter with a bit more flexibility than the Slate offering.
12. Consider digitising the tape at 44.1kHz, 16 bit
This is not really a big deal but might be a consideration if you have a lot of tapes to digitise. 16 bit will save about 30% of space compared to 24 bit. The majority of cassettes had a dynamic range of around 48dB which equates to only 8 bits. Some combinations of deck, tape and very careful recording could get you a little more but it is rare. As for the sampling rate, only the very best tape decks can go to 18kHz although there are some rare machines that can even get to 20kHz so the standard 44.1kHz is more than enough in most cases.
But it’s probably more convenient to stick with 24 bit and if you are concerned about the quality of the filter in the ADC, a higher sampling rate might be preferable. Given the very poor specs of most cassettes though, I’d suggest it’s probably not worth arguing about!
Bonus tip
I’ve personally found that an essential post processing tool is A-1 Stereo control. It will clean up unstable stereo images caused by slight wobbling of the tape as it passes across the playback head. You can reduce the width to make dropouts less noticeable. The “Safe Bass” feature works by filtering the bass to mono, and you can adjust the overall stereo width as well if you like. If you want to repair dropouts in a more advanced way RX’s Interpolate or Spectral Repair modules can also be useful.
Here, for free is a properly looped mapped and tuned selection of most of the original Fairlight CMI III factory library. It also includes a version of the IIx library with a bunch more unknown user content, imported on the series III. This apparently is what anyone with a series III would have acquired over the years. Arguably, the II is the more interesting sounding machine because it changes the sound quality a lot. The Series III was always intended to be state of the art sound quality.
It is provided in the following formats:
Kontakt
EXS-24
NN-XT
Structure
There are WAVs associated with each format so download one of those if you’re not using one of the supported samplers. Bear in mind though, that there are a lot of files since the CMI III supported multi-sampling.
The Kontakt version is compressed in its own folder to avoid problems with moving the directory. This is the only version I have tested properly. The other formats probably need a little tweaking so if anyone wants to improve those feel free to share the files and I will update this folder.
We created this using Redmatica Keymap after extracting the WAVs from a CMI Hard Drive using CMIOS9. I further tweaked the Kontakt version after. So in many cases the loops and the tuning will be more accurate/ smoother than the original. In some cases where the voice is made up of a selection of dissimilar samples, the mapping might be a bit funky 🙂
My hope with this is to:
1. Help people make great music.
2. Bust some of the myths about the Fairlight. Now you can form your own opinion about these classic sounds.
3. I see a number of people trying to make money out of these sounds, selling them in Kontakt format on Ebay, or to Fairlight owners at inflated prices. This is morally wrong. Plus the sounds are not looped as they would be on the Fairlight.
4. There is some cork-sniffing in the Fairlight community, generating illogical arguments about having to own a Fairlight before you are entitled to use these sounds. Furthermore there is no valid copyright claim on this library (which is why so many people sell it on Ebay). It is provided here as free to use. Luckily I am friendly with some Fairlight owners who think this is silly, and my thanks to them for helping with these sounds.
So after a few months under a Non Disclosure Agreement, I can talk about the new Arturia CZV plugin because it has been released for a few weeks now.
Arturia found me originally because of my long-running blog post all about the Casio CZ series of synthesizers which you can read here.
Just before the release, Arturia interviewed me for their Sound Designer page, but I cannot wait to talk to you all about this so I have published it here. I also found an old photograph of my first studio, which I talk about towards the end. So I think this could be interesting for all you music technologists out there!
Arturia: What is your favourite preset and why did you choose it?
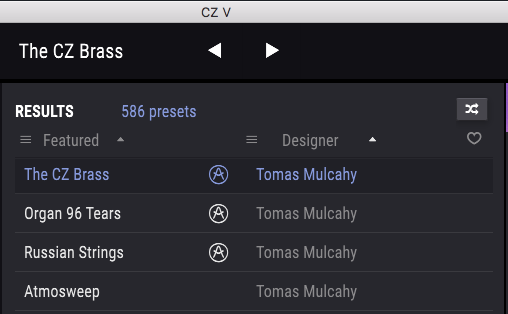
My favourite patch in this set is called Atmosweep. It originated from a set of patches that were accidentally randomised when my CZ RAM cartridge ended up in the washing machine! Amazingly it still worked! After that I worked on the sound for a long time to get the release and atmosphere. The patches from the washing machine used the resonant waves in ways I hadn’t thought of so it was fun to explore this happy accident. With CZ-V my archive of patches since 1992 has really come back to life. Several years ago I deep-sampled 102 of my favourite CZ patches for Kontakt (you can still hear those here). Now I can finally put those away and use the sounds in a much more organic way in CZV with the Macros.
I was stoked to see three of my sounds in the “Featured” list!
Arturia: What are the main strengths of the CZV according to you? Did some specific features or aspect positively surprised you in the instrument?
Tomás: Yes I was pleasantly surprised that the real character of the hardware is right there in CZV! And to answer your question I think there are four main strengths, in order of importance:
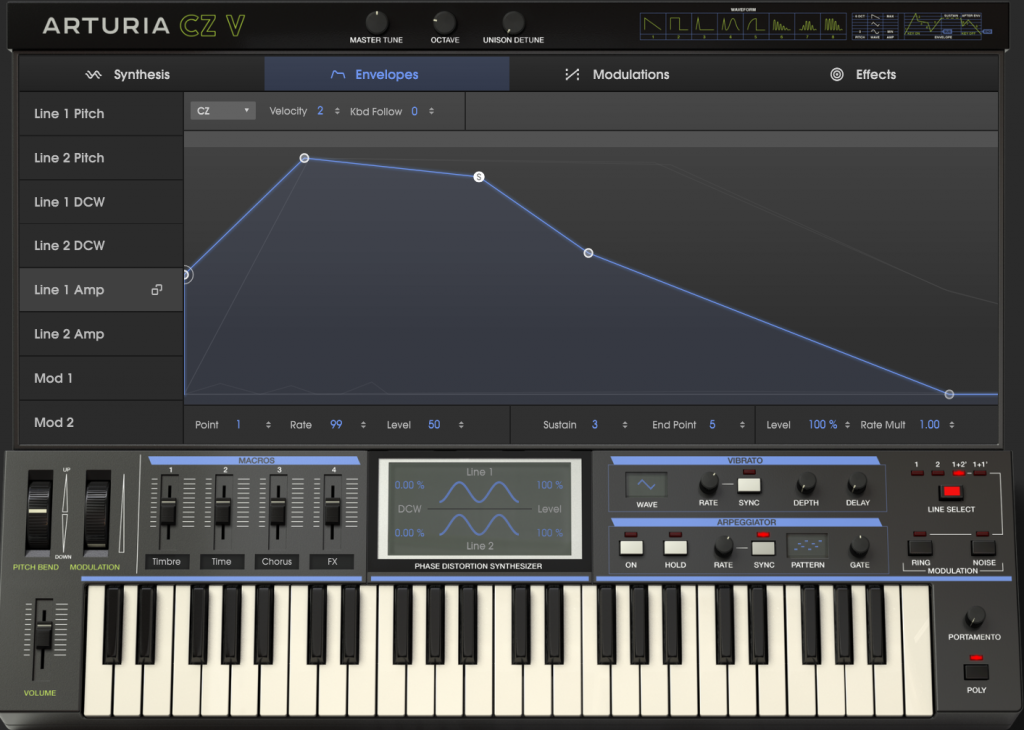
1. The percentage level control on each envelope really opens up the possibilities in a very big way, allowing the CZV to respond to the player in a much more organic way from modulation. It also makes it much easier to have bright or dark within the patch. Even on the CZ-1 with its limited velocity modulation, I would make several versions of a patch going from dark to bright, in order to get this same depth. It was much more laborious than it is with CZV. Now it’s so easy to tweak the patch so that it sits right in your track. I love it!
2. Of course the DCW level can now be swept in real time like an analogue filter, not just with the envelope. This gives a sound unique to the CZ. It’s quite different to sweeping the harmonics on an FM synth (or an analogue synth) and can really warp sounds in a spectacular way, while still keeping the flavor of the basic patch.
Analog Lab library of programmers
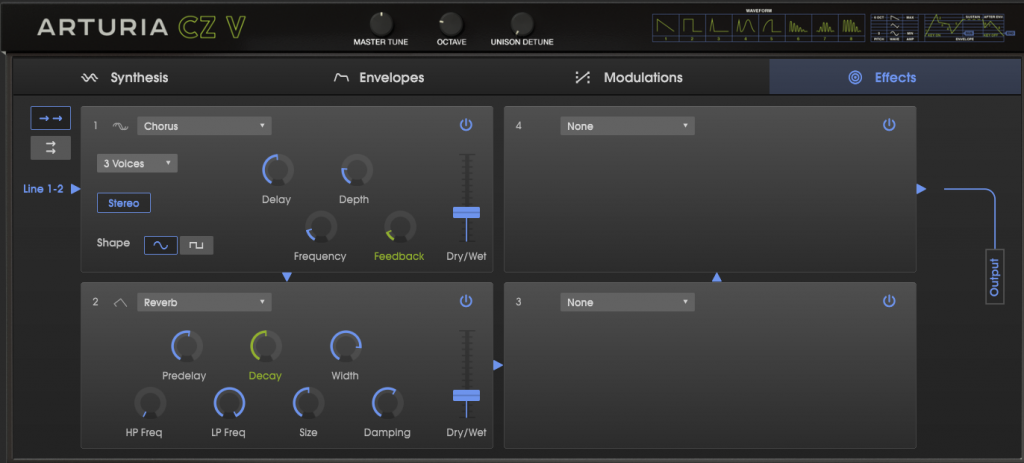
3. I love the chorus. With one voice it is very much like the hardware CZ, and with two or three voices it is lush like the Roland Juno chorus. It is pretty much the perfect chorus for a synth!
4. When I got the initial spec from you, it was the looping envelopes that most excited me. I would have killed for this feature on the hardware, back in the day. It took me a while to figure them out, but I did, with relative ease, and they are hugely useful.
Arturia: What was your approach regarding your sound design work ? Had you a specific type of sounds in mind? A specific method?
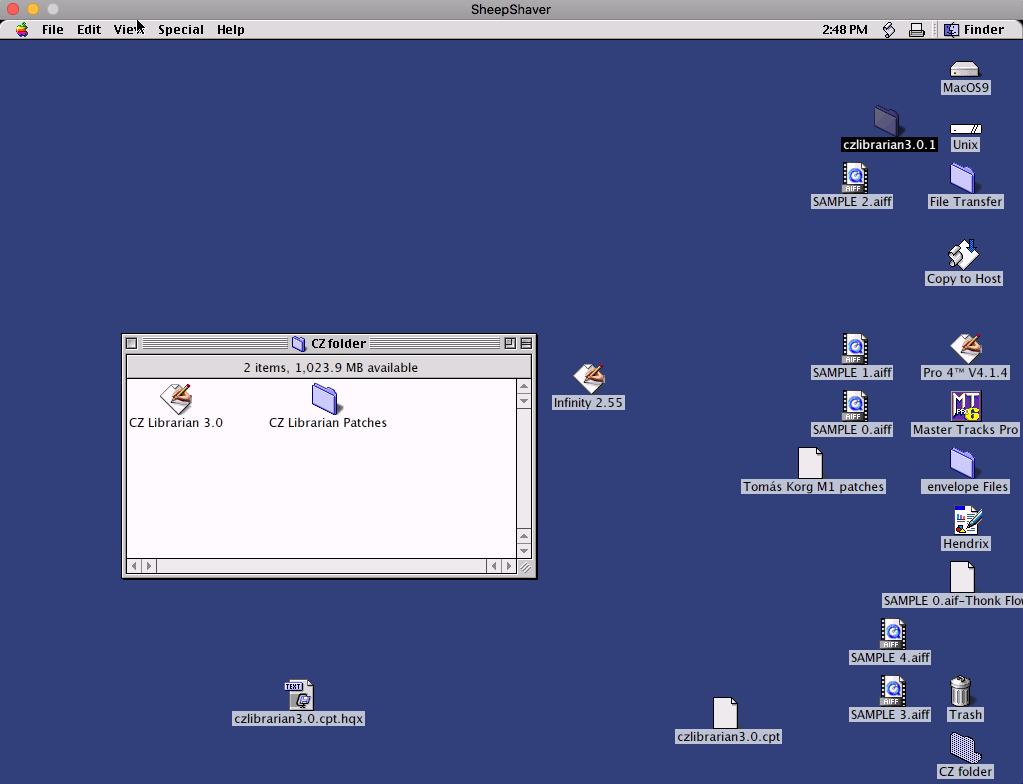
The old CZ Librarian running in Sheepshaver VM
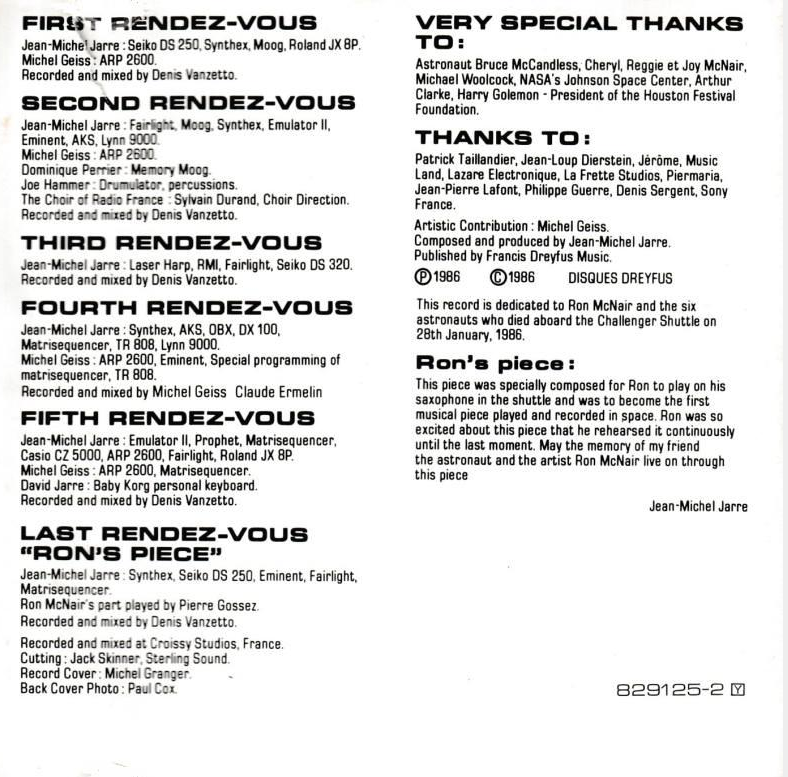
Tomás: There are two answers to this, because I have been using a CZ since 1992, starting with the CZ-5000 and ending up eventually with the CZ-1. Back then it was my only polysynth. With the sequencer it was like an affordable workstation, so I wanted it to make every sound possible. An impossible goal, but a great way to learn everything about a synth. I wanted the sounds that I heard on classic records, such as Jarre’s Rendezvous where he uses the Fairlight and the Synthex as well as the CZ-5000. I would spend a lot of time trying to get these classic sounds on the CZ, and learning what the limits and unique qualities of the synth were.
Later when I had more synths I used the CZ-1 for its strengths. To me it is a wonderful bass machine. I love pad sounds too, and the CZ does these with a unique character. You won’t get wide soft MemoryMoog pads, but you can get some very atmospheric stuff using the resonant waves with the envelopes for movement within the sound. Nothing else sounds quite like it.
I always carefully backed up my patches and kept them well organized with descriptive names, first with cassettes and later with SysEx on the Apple Mac. So I was able to load my library into CZV. It’s so cool to see the patch names you made years ago coming up in the list!
The second answer is that with CZV it is more of an adventure. This is because it is exactly the same as the old hardware and at the same time is a very up to date synth with all the features we take for granted in software today. So the method was simply to explore and have fun! Several times I started from an initial patch and just explored the new possibilities, especially with the extra Mod Envelopes, the more detailed velocity modulation and the Custom Waveform.
But more often, I was able to take an old patch and make it more like what I wanted it to be from those classic records. Unison Mode really made that happen in a big way, and again the detailed modulation and the live interaction with the Macros made the sounds much more alive than is possible on the original machine.
Now the CZ is like a MiniMoog or a Prophet 5, with the sound-morphing easily integrating with your performance in a truly organic way. Thanks so much to the Arturia team for making the dreams of 18 year old me come true!
In January/ February 2016 I beta tested a new memory card, originally intended for Roland devices but I’ve confirmed it works with the Akai MX-1000. Useful if you’re using it live as a master controller for Apple Mainstage. This 26 year old keyboard can be set up as a remote for Mainstage, and with the memory card you’ll have more than enough program changes to cater for the most demanding show.